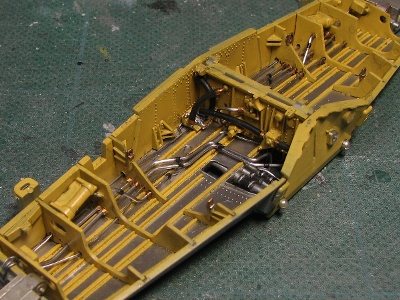
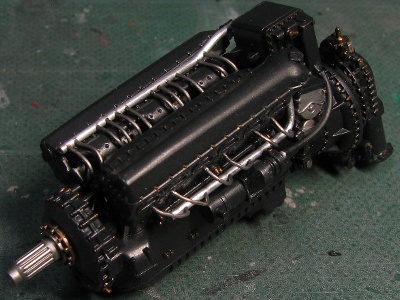
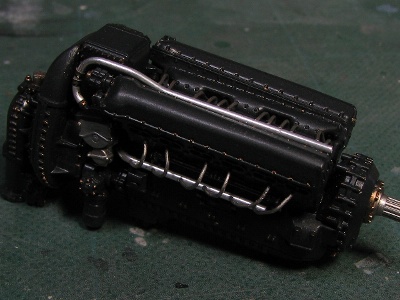
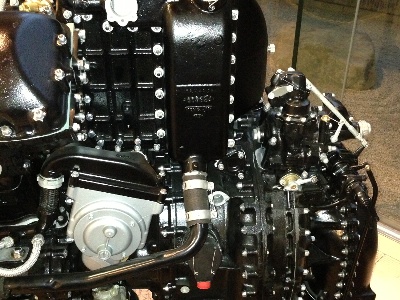
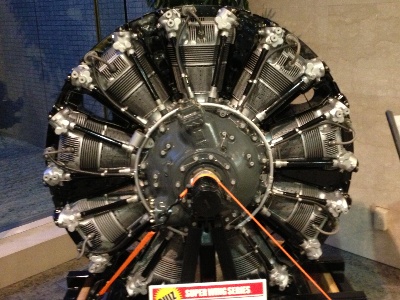
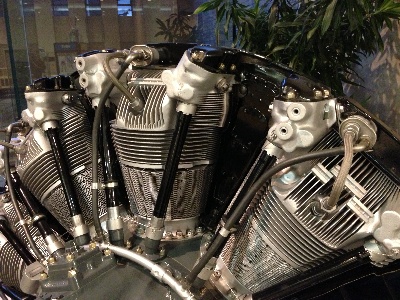
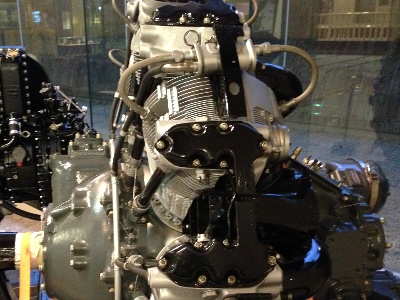
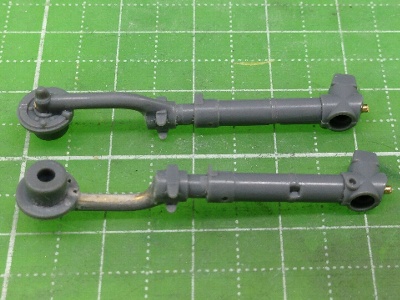
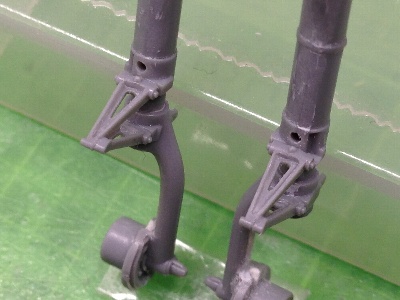
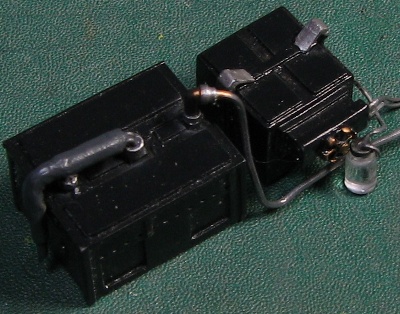
Some pipes are added with vinyl tube (black) and aluminum rods (silver).
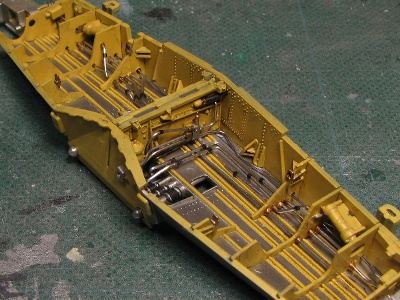
Black or Brass joints are made from masking tape.
P-51D Mustang part-2
|
|
|
Some pipes are added with vinyl tube (black) and aluminum rods (silver). |
Black or Brass joints are made from masking tape. |
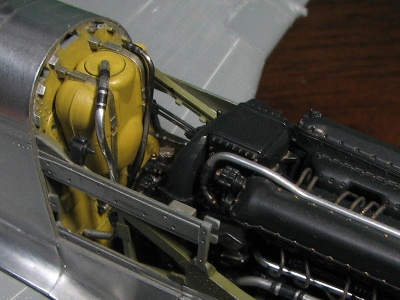
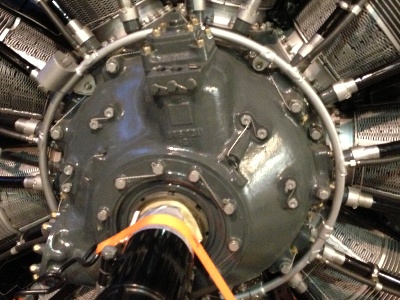
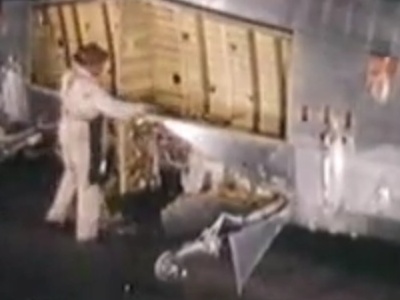 These photos are from WWII original movie |
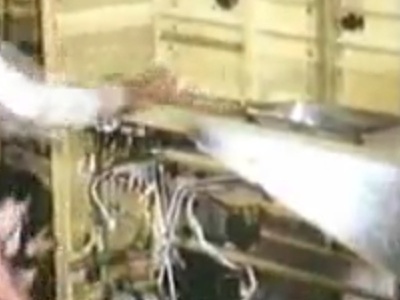 The ceiling is silver, other portions are Zinc Yellow Chromate, and pipes are silver. |
|
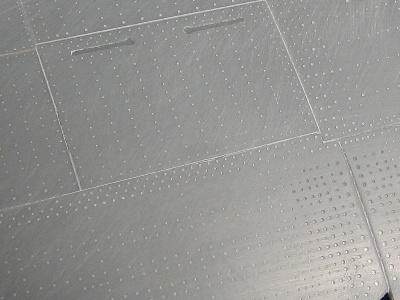
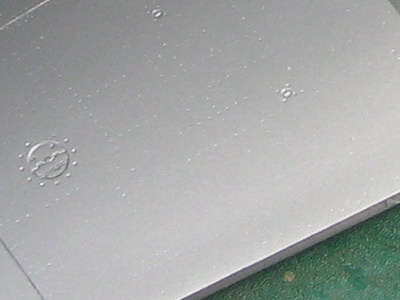
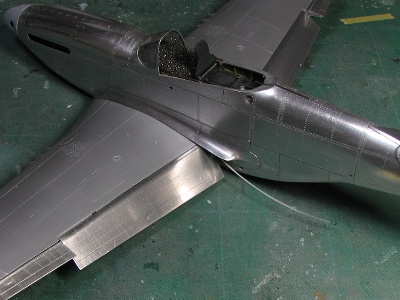
So, I decided to fill in Tamiya's rivets with Mr.Surfacer 500. When Mr. Surfacer was applied with a brush, the air in rivet holes prevented the surfacer from filling the holes; so I used a small spatula (chisel) and the surfacer was pushed into the holes forcibly. Panel lines were also filled in on the actual aircraft, but I didn't fill them. The reason, I wanted to depict them. Imagine the model wing, with no panel line, and no rivets. |
 |
 |
|
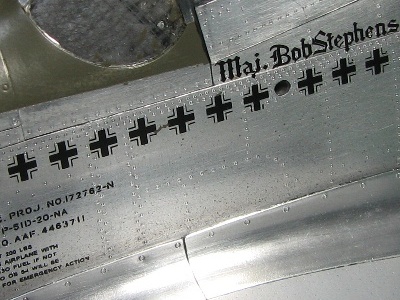
Tamiya kit depicts bases for HVAR launcher equipped aircraft after, D-20-NA 44-72226, on the lower wing. So, if you are building earlier model than 44-72226, you should fill in these bases.
|
 |
 |
 |
 |
|
After D-30 model, the battery was moved from the cockpit to the space between the engine and the oil tank and Tamiya's kit contained the parts for the battery platform, however, there is a void in the earlier model.
|
 |
 |
 |
 |
 |
 |
 |
 |
 |
 |
|
|
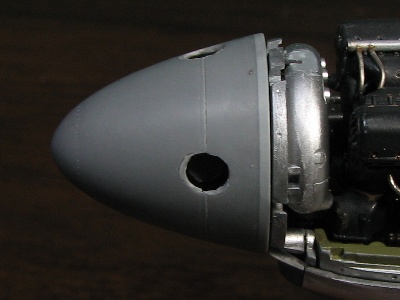 The position of propeller is moved aft 1mm (0.04") due to the additional spinner length. |
 |
|
|
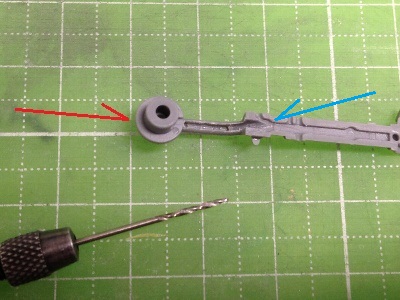 The chase is drilled with a pin-vise from the red and blue arrows. |
 1.0mm (0.04") brass rod is inserted and solidly fixed with CA glue. |
 This method makes the gear ridged, plus details at the same time. I call this "the hybrid gear." |
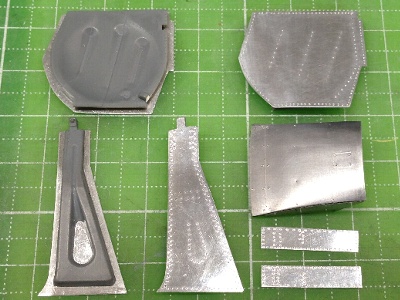 0.3mm (0.01") aluminum sheets are glued on the plastic parts. Plastic parts will be painted Mr. color SM06 Chrome Silver. |
|
|
 |
 Rivets re-appear. Oops. |
|
|
 |
|
|
 And here, another problem, there is a gap. |
 This is second try, notice no gap. |
|
|
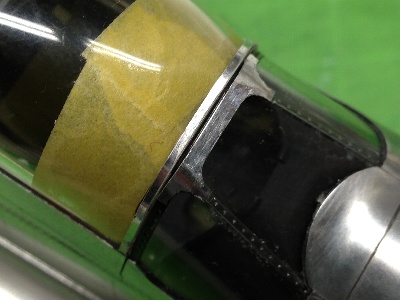
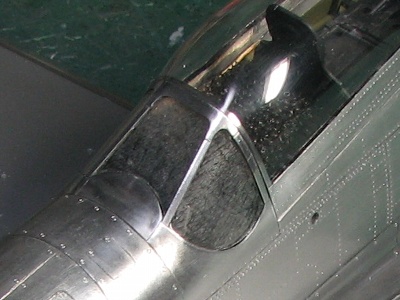
 Clear painting is completed. |
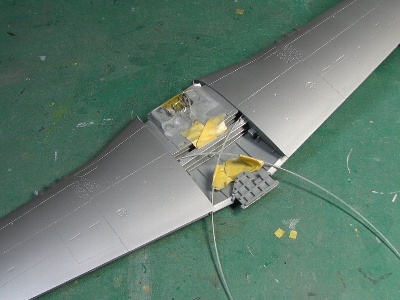
 BTW, are you wondering what this white wire is? |
|
|
 The LED is put on aluminum foil. The gray box is the battery box. Three nylon wires are connected to the LED to pick up light. |
 Light on. It's a little dark. Well, that is a future task. |
|
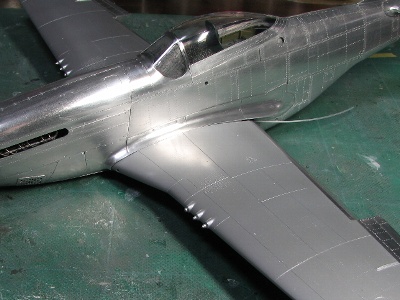
Anyway, the wing was glued on the fuselage, and I proceeded to the marking process.
|
 |
 |
|
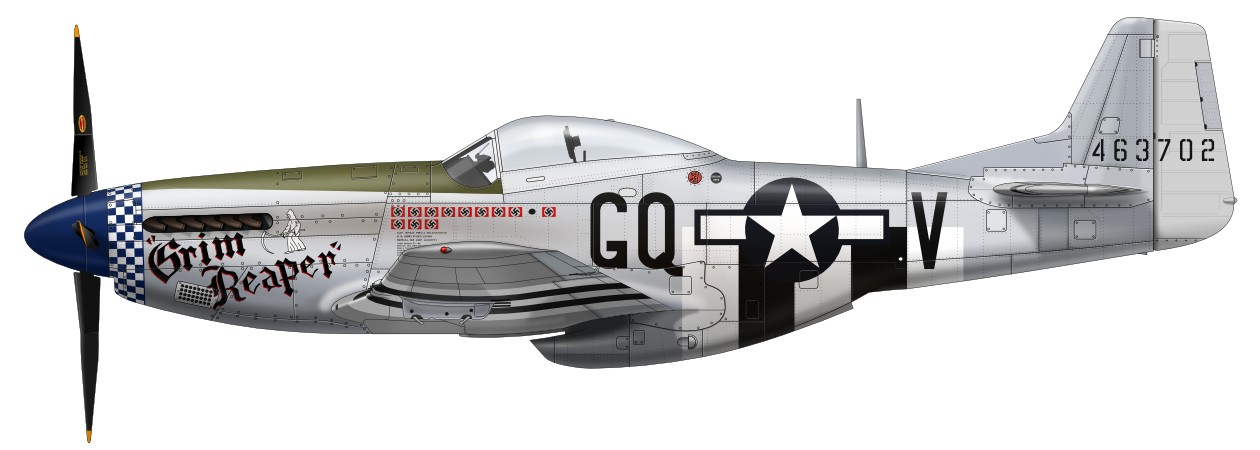
In contrast with them, I selected Blue/White nose "Grim Reaper" flown by the top ace of 354FG, 355FS, Captain L. Blueland, but, the code letter and serial number are somewhat questionable. The existing color profile shows the code letter GQ-U, but original photo seems as GQ-V or GQ-Y (See the photos in "Osprey Aviation Elite Units 7 354th Fighter Group" page 110). |
 |
|
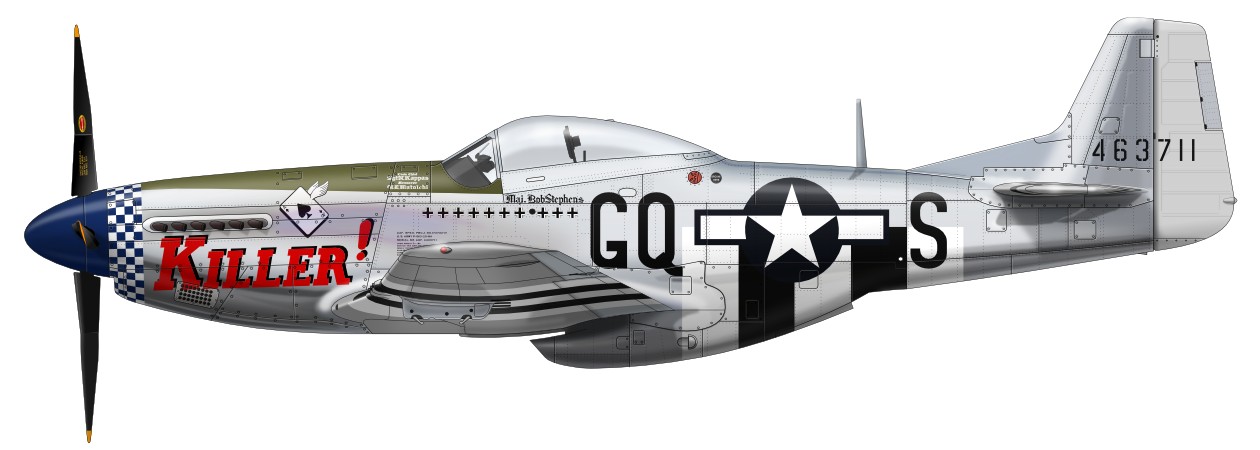
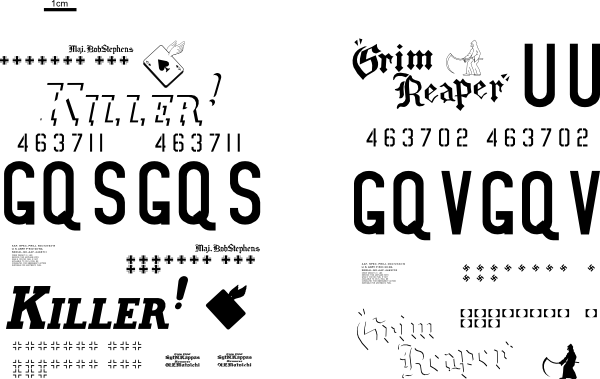
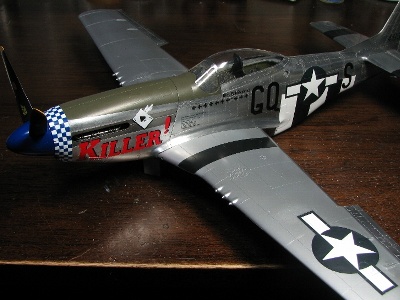
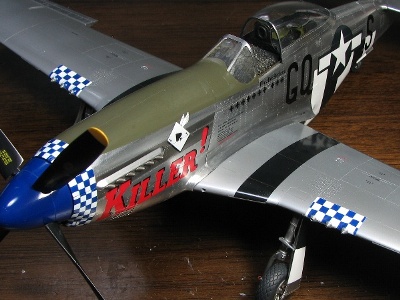
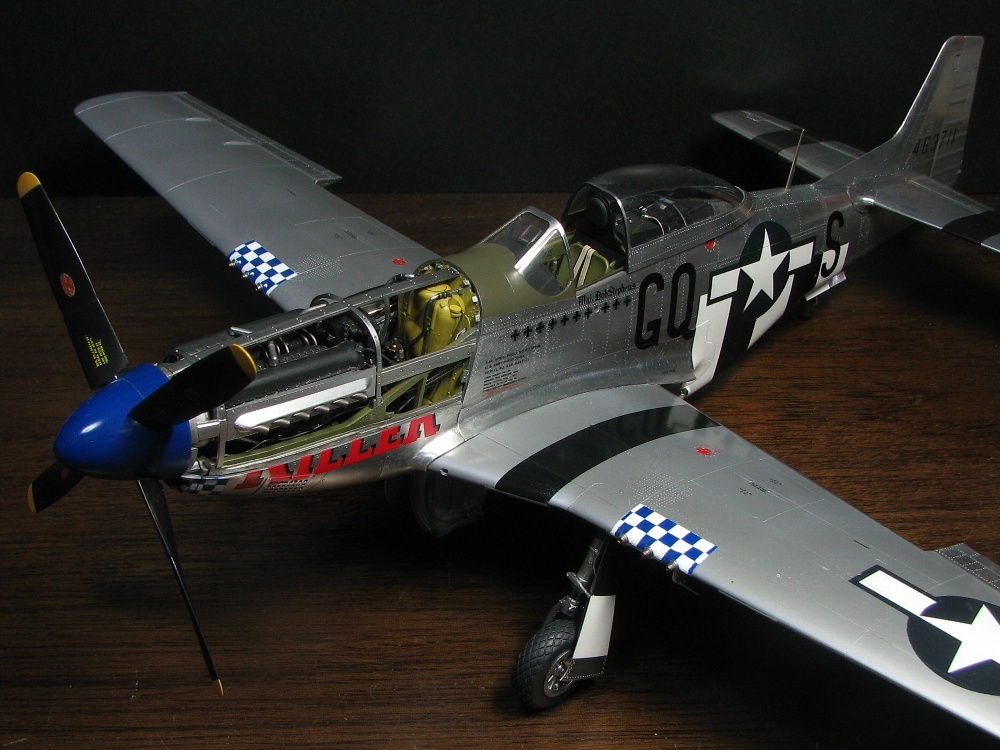
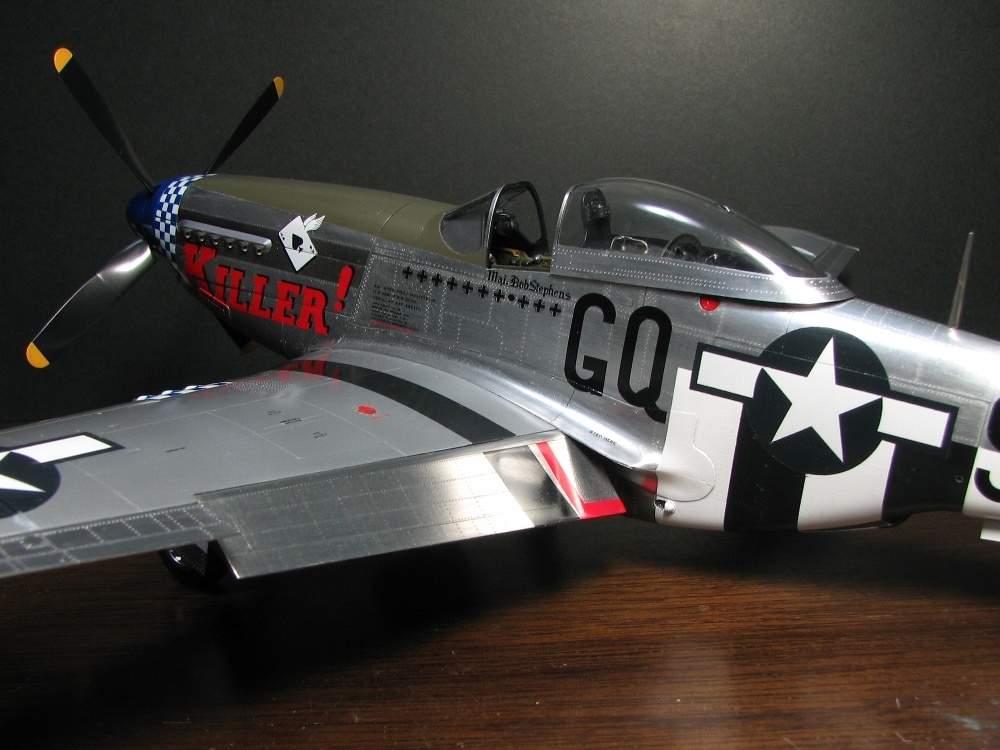
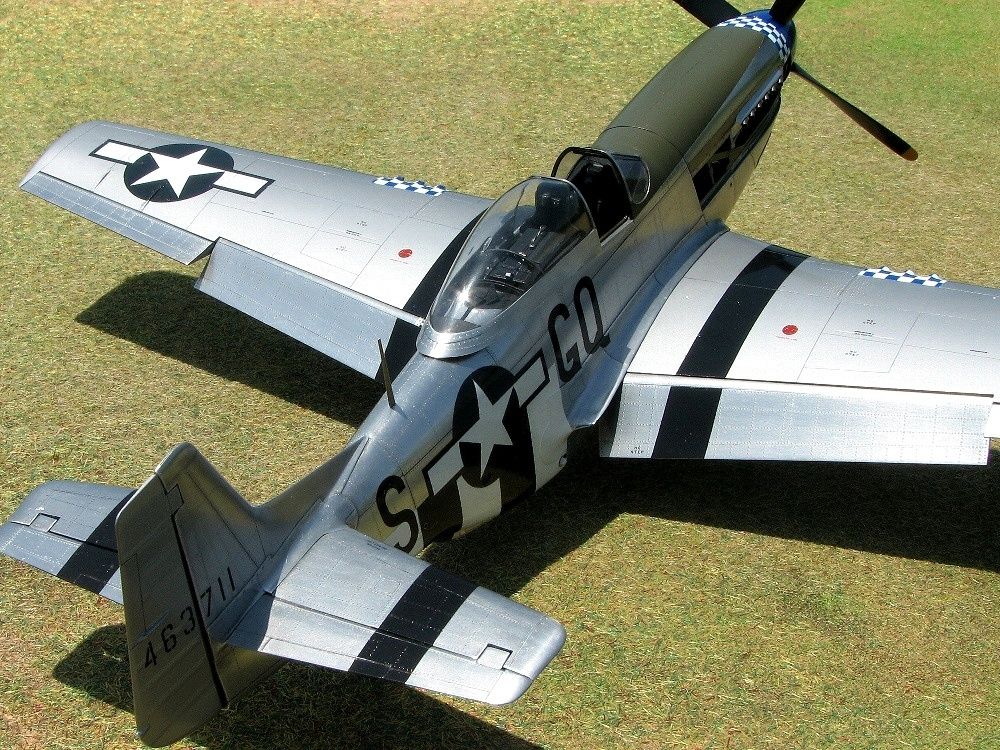
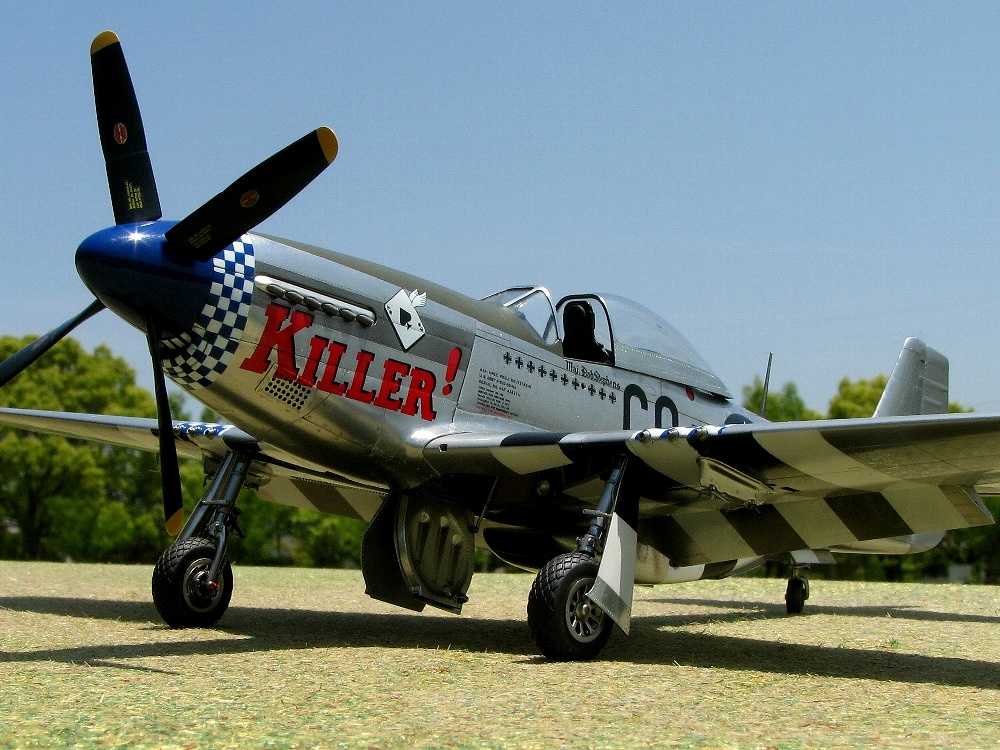
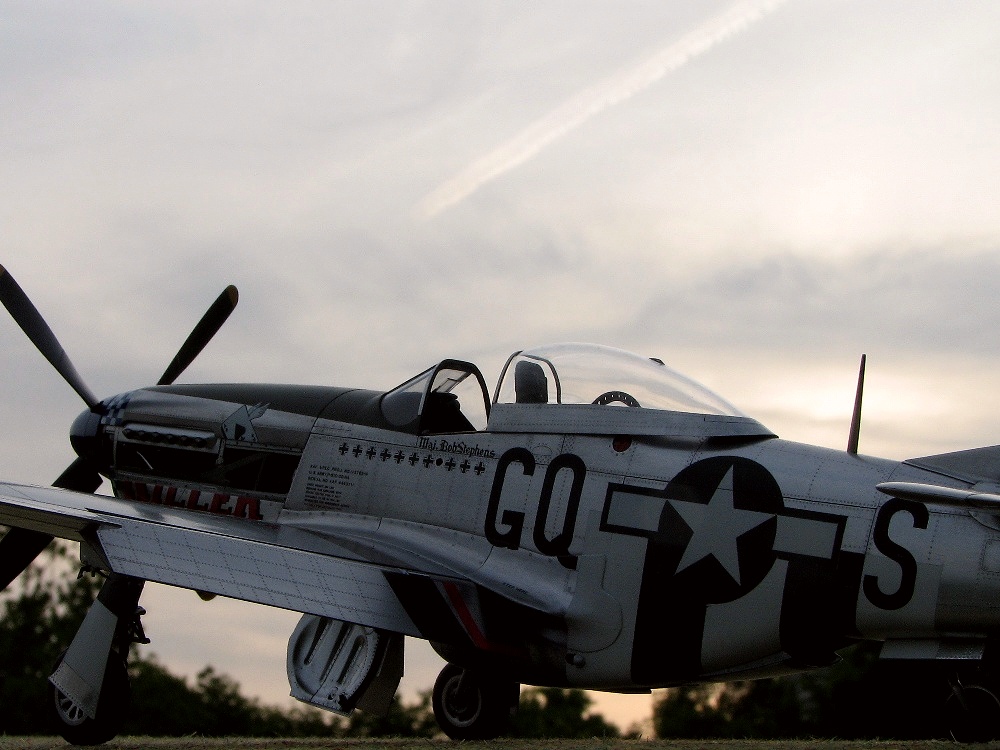
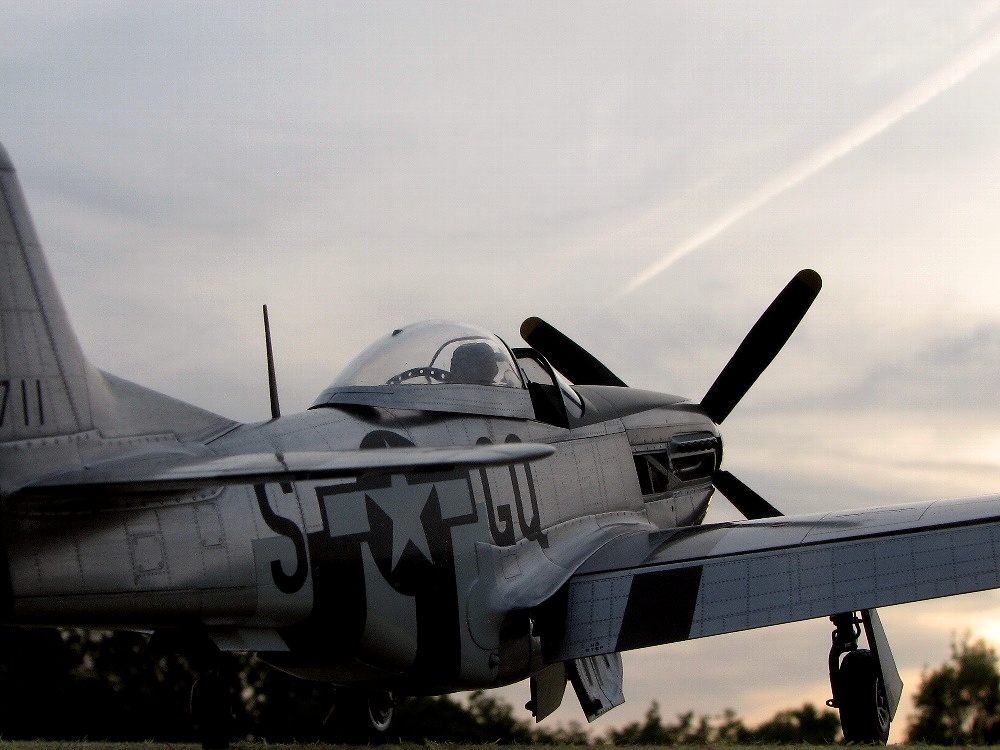
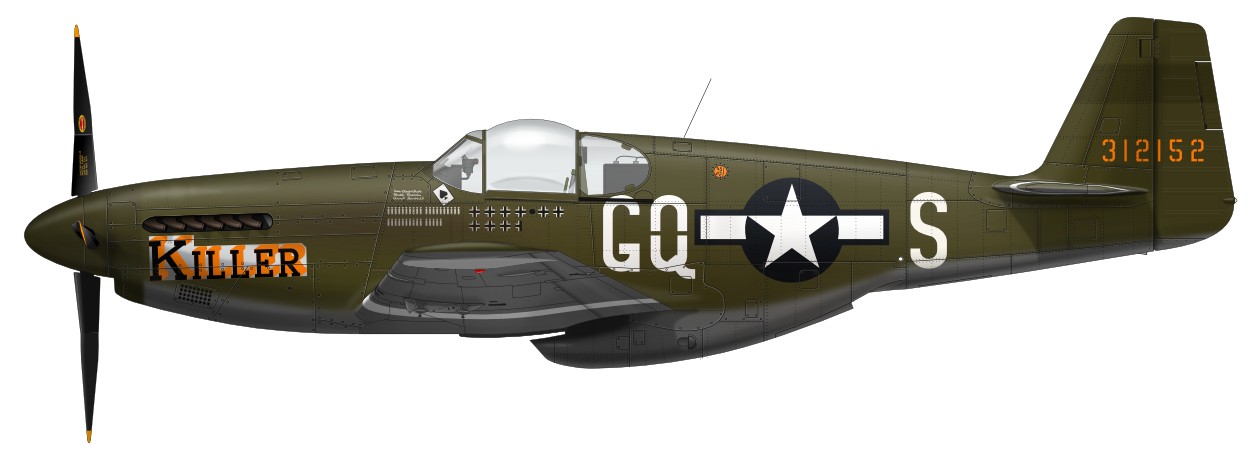
Finally, I decided on 355FS CO Major Robert W. Stephens's "KILLER!". I referred to, "Osprey Aviation Elite Units 7 354th Fighter Group" ISBN 1-84176-315-2, The "KILLER!," is an Inglewood D-20-NA. The exhaust fairing, no rear view mirror, black band on the upper wing root, could be confirmed from the reference, and you cannot see the latter half of the aircraft in the photo. So markings were presumed from other aircraft of 355FS. For example; there was no band on the vertical fin, but a black band on horizontal fin. The position of the D-Day stripes of 355FS, not of the norm, so the color profile of above reference is incorrect. |
 |
|
|
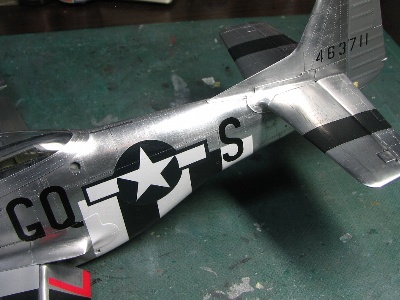
 Black and Insignia Blue are finished. White star and bars were masked while blue was painted. |
 The nose is painted White first. |
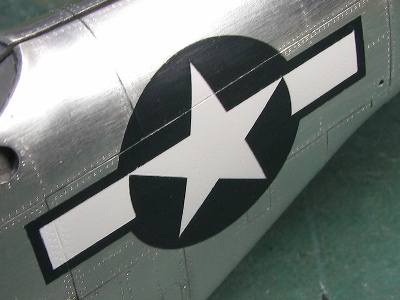 Insignia is finished. Blue and White are painted side by side, not one and one. Gloss Sea Blue is used for Insignia Blue. |
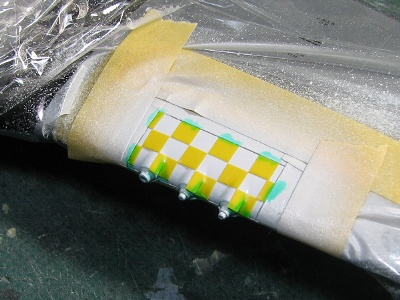
 Blue checkers are masked and painted over White. |
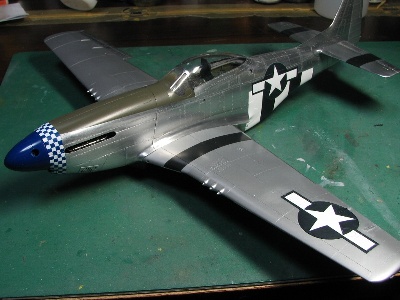 D-Day stripes and Olive Drab are masked and painted. |
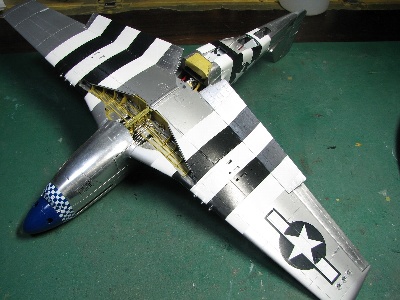 The position of 355FS's DD stripe is like this. |
|
|
 |
|
|
 Dry decals are applied. |
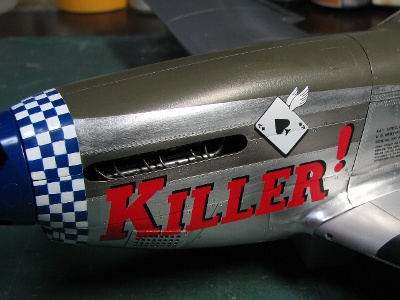 Order of dry decal application; black dry decal for KILLER! is applied 1st, red KILLER! 2nd, then white for the card and finally black for the card details. |
 Caution stencils and score markings are finely printed. |
 |
|
CrewChief
|
 |
 |
|
Finally, painting is finished. The master of the dry decals was revised as well (not yet ordered).
|
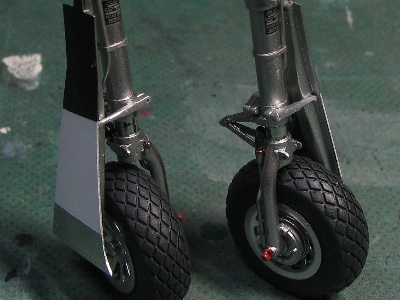 Tamiya's kit tire is not correct in the tread pattern. So tires were exchanged with Barracuda's cast resin parts. Barracuda's tire is not perfect either; the cross sectional shape is incorrect. |
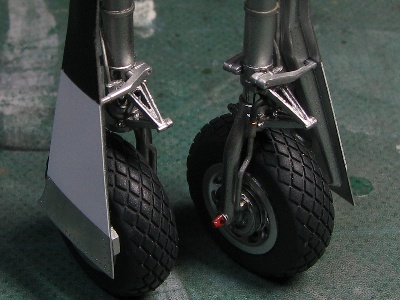 The landing gear is the only weak point of Tamiya Mustang, however, the Hybrid Gear and resin tire may overcome this weak point. |
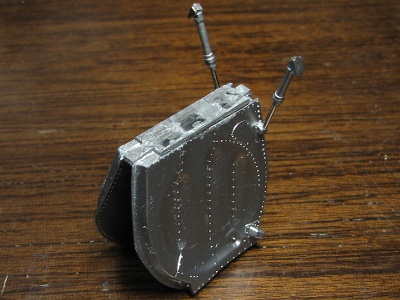
 The radio and battery are Barracuda's resin as well. The details is good but the radio cable interferes with the canopy. The bottle is made of clear sprue. |
 The seat belts are from NH4 1/32 WWII US Aircraft Seatbelt Set from Finemolds. I made a mistake, I set seat belts left-right reversal. The N-9 gun sight is confirmed by the original photo. P-51's also used N-3 for early model, K-14 for late model, and a number of Mk.2 were used for 8AF and RAF aircraft at air base's in GB. |
 The wheel covers interferes with the under cowl remove. Thus, the covers are built as detachable using magnets. |
 Three magnets are installed in the center wall. |
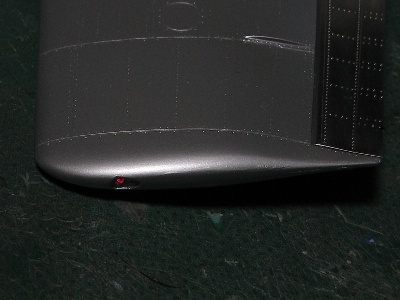
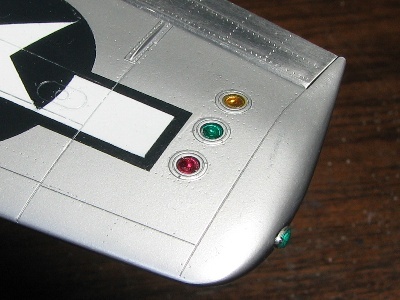 The reflectors of tricolor lights are made of aluminum sheet. The lenses are made of "UV Clear" from Sujiborido. This UV Clear is a transparent glue that cures from UV light. Search for "āXāWā{āŖō░ü@UVāNāŖāAü[". |
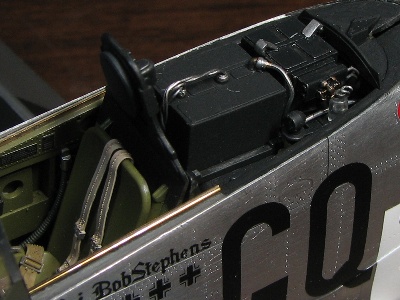 The radio is placed back on kit part. Note; the kit radio is back to front. |
 |
 |
|
|
 |
 |
 |
 |
 |
|
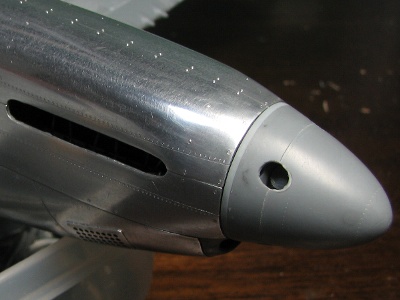
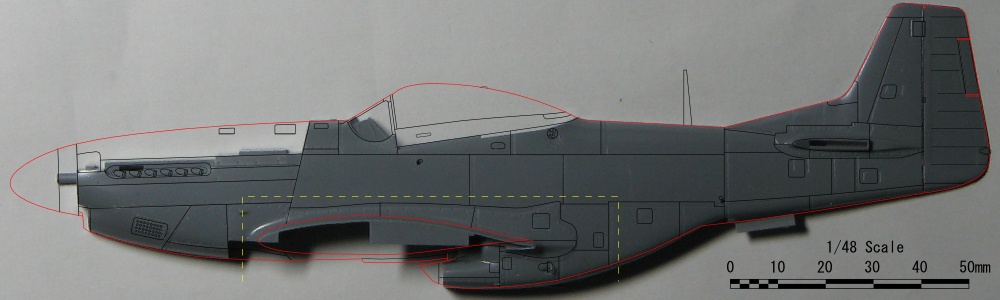
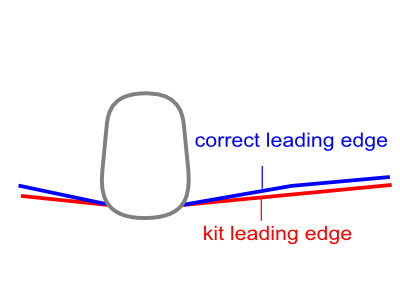
The easy way to correct the wing height may be to cut at the yellow line, cut off the joining portions and re-assemble. Also, the leading edge of the wing bulge droops down in actual aircraft but the 1/48 kit doesn't (1/32 kit is correct). Thus the intersection position of the fuselage side and the wing leading edge doesn't have to be corrected this procedure works. Another problem is, the width and cross-sectional shape of nose cowl. The kit nose is slim and the kit doesn't depict the presence of engine cylinder head underneath. 1/32 kit; is perfectly accurate, of course! |
 |
 |
|
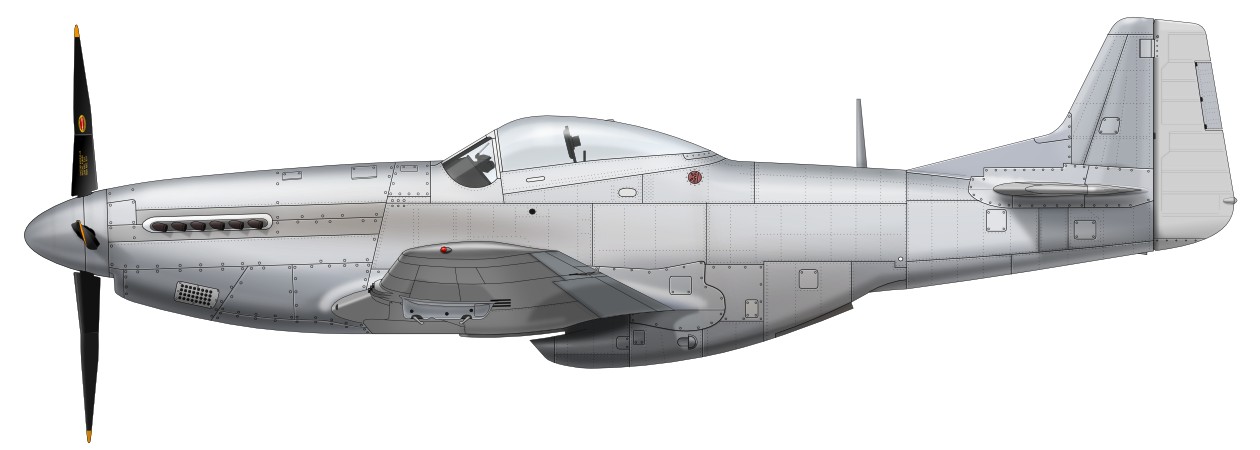
First, a lady wearing no makeup at all. The illustration of Natural Metal Finish was somewhat difficult. The methods were to emphasis a highlight and shadow gradient, to alter tone of some panels and possibly give depth. I'm happy if you can see the rudder is not covered with metal. Even when plain NMF aircraft are illustrated, painting markings on aircraft is not easy, due to the reflectance ratio difference from metal and paint. So, the new layer of highlight/shadow gradient of the markings will be laid on top of the marking layer which was on top of the NMF layers, and the old layer of the highlight/shadow gradient of NMF is adjusted. Conversely, if the marking layer is deleted from the illustration, it reverts back to plain NMF. Of course, the reflectance ratios of matte Olive Drab and gloss markings of insignia are different as well, so the highlight/shadow gradient will be changed too. |
 |
|
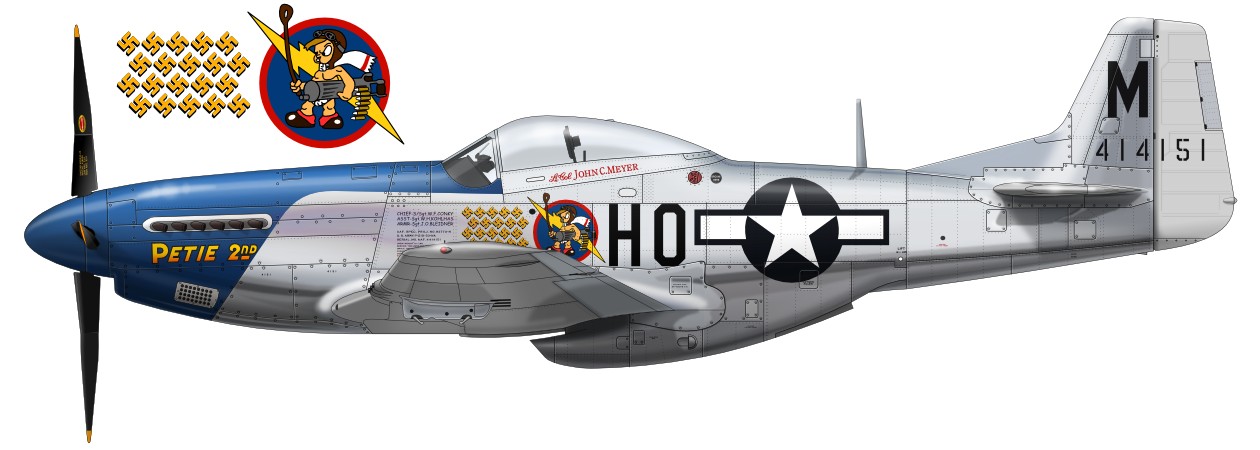
Next, PETIE 2nd, D-10-NA of John Meyer, CO of 475FS, 352FG. In this profile, I intended to depict the polished restored Warbird so I changed the gradient of the highlights, and added reflection in the mirror finish. See the colored metal surface burnt by the exhaust heat? |
 |
|
Next one is a sense of fun. D-5-NA flown by Captain Urban Drew, 375FS 361FG, on July/11/1944. Previously, this aircraft was said to be painted Blue. Now, it is obvious that the aircraft was painted Olive Drab. But, in my mind, I still feel this aircraft was Blue. The profile depicts correct markings except for the Navy Blue scheme. Note the Olive Drab appears below the windshield. |
 |
|
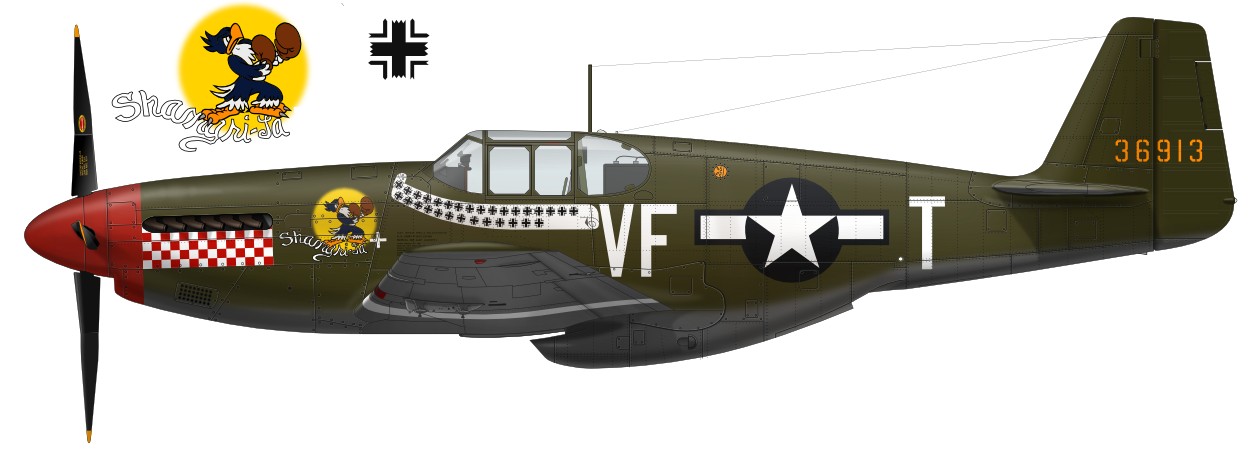
Come on the fastback model. Here I go with one of the most famous fastback Mustang, B-7-NA "Shangri-La" of Captain Don Gentile, 336FS 4FG. Note the difference of the upper cowl sideview outline between D/K and B/C model with above and below profiles. |
 |
|
I added the Malcolm hood and illustrated Captain Bob Stephens's other aircraft, B-1-NA "KILLER". I could only see the photo of the port nose. I followed "Osprey Aviation Elite Units 7 354th Fighter Group" for the markings research of the latter half of this aircraft. The gun sight is uncertain. |
 |
|
C-5-NT "The FOX" of First Lieutenant James Wood, 487FS 352FG. The Inkscape picture object for John Meyer's aircraft can be used again. |
 |
|
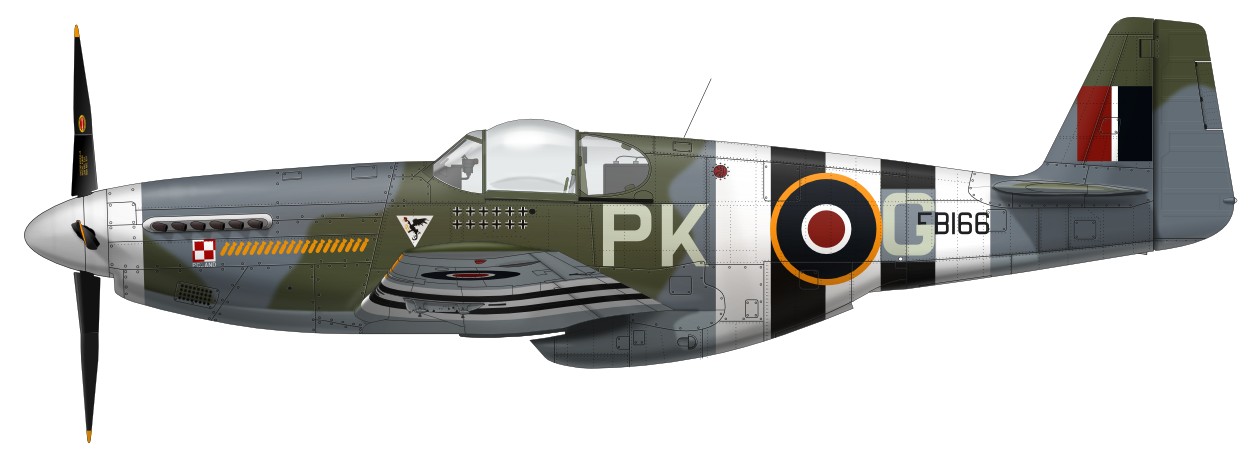
RAF 315 Sqn CO Squadron Leader E.Horbaczewski's Mustang III s/n FB166 in June 1944. Though the existing profiles show various markings, my profile depicts Ocean Gray back ground of the letter "G" just as the original photo. The D-Day stripes of the actual aircraft were painted more roughly, but I didn't depict that exactly as the original. The gun sight is Mk.2. |
 |
|
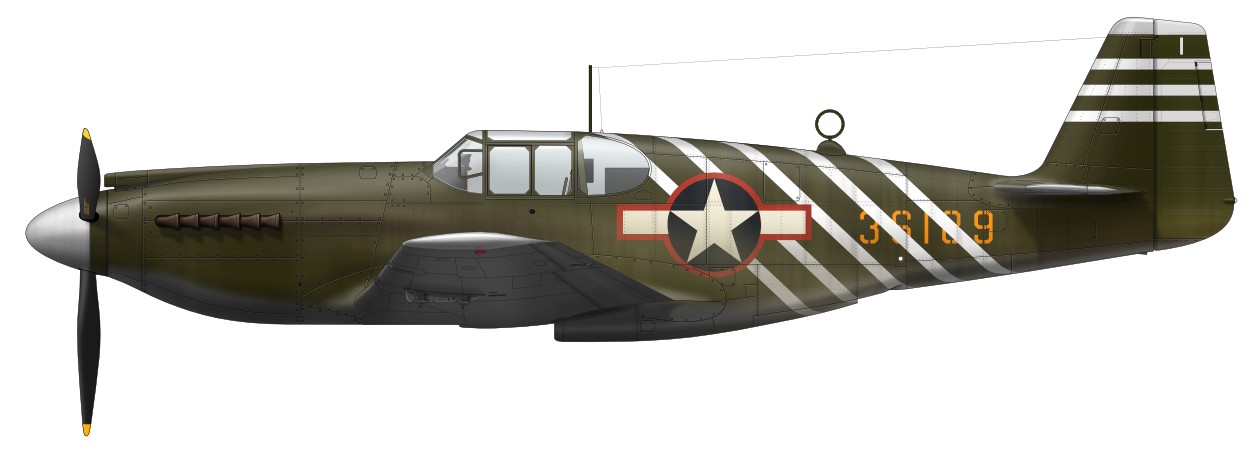
P-51A of 1ACG CO Lieutenant Colonel Phil Cochran, Burma in 1943. There are some interpretations of this aircraft and I don't have assurance of my profile. Anyway, the fringe of insignia looks lighter than the center. The wing tip might be Natural Metal, but I haven't seen other aircraft in the 1ACG's. The drawing of Alison Mustang is a trace of actual photos. The total length is 32' 2-7/8". The length of the spinner is 26". The wing position of Alison model is 3 inches higher than Merlin model. |
 |
|
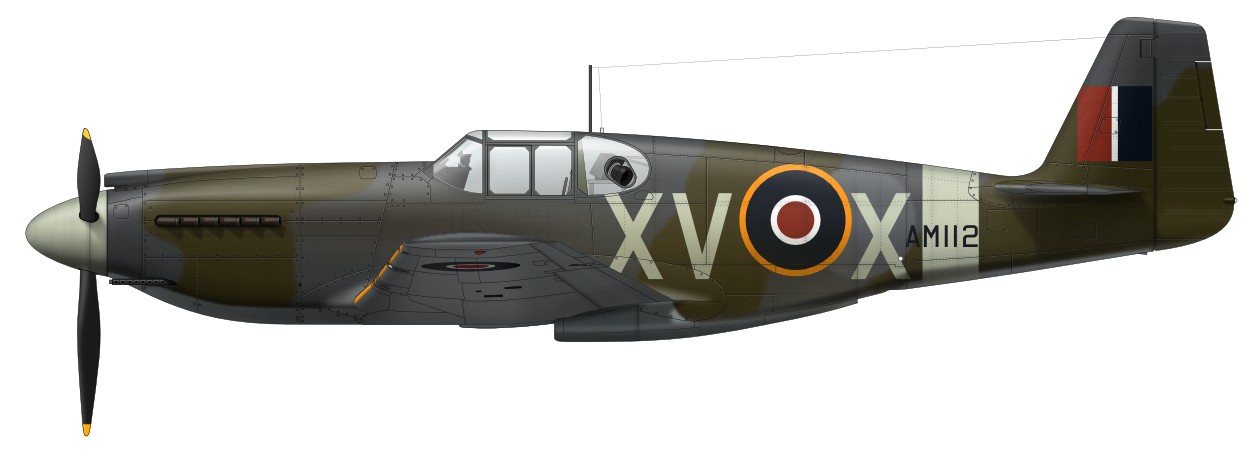
Mustang I of 2 Sqn, in 1942. Some RAF Mustang I's had straight exhaust as this profile illustrates, but some aircraft had the larger fish-tail type exhaust than normal USAF fish-tail type. According to original color photos of RAF Mustang, I depict "Quasi" RAF Temperate Land Scheme. That is; Dark Green (possibly Olive Drab) and Ocean Gray (possibly Neutral Gray). The repainted fuselage roundel was shown in other Mustang I's, but it's uncertain for this aircraft. |
 |
|
This is the final profile. 12FBS's F-51D-25-NA of Korean War in the summer of 1952. This aircraft was made in Inglewood factory but retrofitted with the Aero Products propeller and shorter spinner. And, though the photo is not sharp, Dallas canopy might have been retrofitted. |
 |
|
|
| 1 | The Famous Airplane of the World No.75ü@P-51A,B,C Mustang ISBN 4-89319-072-5 | Bunrindo |
| 2 | The Famous Airplane of the World No.79ü@P-51D,H,K Mustang ISBN 4-89319-076-8 | Bunrindo |
| 3 | The Famous Airplane of the World (Old Edition) No.28 8/1972 P-51A-C Mustangü@ | Bunrindo |
| 4 | The Famous Airplane of the World (Old Edition) No.133 9/1982 P-51D/H/K Mustang | Bunrindo |
| 5 | Koku Fun additional volume Air Combat No.7,12,18,19 | Bunrindo |
| 6 | Aero Detail 13ü@North American P-51D Mustang ISBN 4-499-22644-9 | Dainippon Kaiga |
| 7 | Osprey Military Aircraft Series 17 P-51 Mustang Ace of 8th Air Force ISBN 4-499-22766-6 | Dainippon Kaiga |
| 8 | Osprey Military Aircraft Series 25 P-51 Mustang and P-47 Thunderbolt Ace of Pacific Theater ISBN4-499-22791-7 | Dainippon Kaiga |
| 9 | Model Art Extra Number 401 WWII P-51 Mustang | Model Art |
| 10 | Model Art Extra Number 713 WWII Paints & Markings Guide of AAF Fighters (Europe) | Model Art |
| 11 | P-51 Mustang / P-47 Thunderbolt ISBN 4-7698-0638-8 | Kojinsha |
| 12 | P-51 Mustang In Action No.211 ISBN 978-0-89747-552-5 | Squadron/Signal |
| 13 | P-51 Mustang In Action Aircraft No.45 ISBN 0-89747-114-8 | Squadron/Signal |
| 14 | Walk Around 7 P-51D Mustang ISBN 0-89747-360-4 | Squadron/Signal |
| 15 | Walk Around 13 Alison Engined Mustangs ISBN 0-89747-386-8 | Squadron/Signal |
| 16 | D&S vol.50 P-51 Mustang part-1 ISBN 1-888974-02-8 | Squadron/Signal |
| 17 | D&S vol.51 P-51 Mustang part-2 ISBN 1-888974-03-6 | Squadron/Signal |
| 18 | P-51 Mustang ISBN 0-89747-350-7 | Squadron/Signal |
| 19 | Aces of the Eighth ISBN 0-89747-055-9 | Squadron/Signal |
| 20 | Aces of the Southwest Pacific ISBN 0-89747-063-X | Squadron/Signal |
| 21 | Mig Alley ISBN 0-89747-081-8 | Squadron/Signal |
| 22 | Air Force Colors Volume 2 ETO & MTO 1942-1945 ISBN 0-89747-108-3 | Squadron/Signal |
| 23 | Air Force Colors Volume 3 Pacific and Home Front, 1942-1947 ISBN 0-89747-376-0 | Squadron/Signal |
| 24 | The 31st Fighter Group in World War II ISBN 0-89747-514-3 | Squadron/Signal |
| 25 | Checkertails The 325th Fighter Group in the Second World War ISBN 0-89747-316-7 | Squadron/Signal |
| 26 | 357th Fighter Group ISBN 0-89747-380-4 | Squadron/Signal |
| 27 | 20th Fighter group ISBN 0-89747-368-X | Squadron/Signal |
| 28 | 4th Fighter Group in World War II ISBN 0-89747-515-1 | Squadron/Signal |
| 29 | Flying Scoreboards Aircraft Mission and Kill Markings ISBN 0-89747-305-1 | Squadron/Signal |
| 30 | Planes, Names & Dames Vol.1 1940-1945 ISBN 0-89747-241-1 | Squadron/Signal |
| 31 | Fighting Colors P-51 Mustang in Color ISBN 0-89747-135-0 | Squadron/Signal |
| 32 | Aircraft Of The Aces 1 Mustang Aces of the Eighth Air Forces ISBN 1-85532-447-4 | Osprey |
| 33 | Aircraft Of The Aces 7 Mustang Aces of the Ninth & Fifteenth Air Forces & the RAF ISBN 1-85532-583-7 | Osprey |
| 34 | Aircraft Of The Aces 21 Polish Aces of World War 2 ISBN 1-85532-726-0 | Osprey |
| 35 | Aircraft Of The Aces 31 'The Long Reach' VIII Fighter Command at War ISBN 1-85532-907-7 | Osprey |
| 36 | Aircraft Of The Aces 51 'Down to Earth' Strafing Aces of the Eighth Air Force ISBN 1-84176-437-X | Osprey |
| 37 | Aircraft Of The Aces 61 'Twelve to One' V Fighter Command Aces of the Pacific ISBN 1-84176-784-0 | Osprey |
| 38 | Aircraft Of The Aces 96 Mustang Aces of the 357th Fighter Group ISBN 978-1-84603-985-0 | Osprey |
| 39 | Osprey Aviation Elite Units 7 354th Fighter Group ISBN 1-84176-315-2 | Osprey |
| 40 | Osprey Aviation Elite Units 8 352th Fighter Group ISBN 1-84176-382-9 | Osprey |
| 41 | Osprey Aviation Elite Units 10 359th Fighter Group ISBN 1-84176-440-X | Osprey |
| 42 | Osprey Aviation Elite Units 21 Very Long Rang P-51 Mustang Units of the Pacific War ISBN 978-1-84603-042-0 | Osprey |
| 43 | Osprey Aviation Elite Units 24 332nd Fighter Group - Tuskegee Airmen ISBN 978-1-84603-044-4 | Osprey |
| 44 | Osprey Aviation Elite Units 30 4th Fighter Group 'Debden Eagles' ISBN 978-1-84603-321-6 | Osprey |
| 45 | Osprey Front Line Colour 01 F-51 Mustang Units Over Korea ISBN 1-85532-917-4 | Osprey |
| 46 | Monografie Lotnicze 55 North American P-51 Mustang cz.1 ISBN 83-7237-024-9 | AJ-Press |
| 47 | Monografie Lotnicze 56 North American P-51 Mustang P-82 Twin Mustang cz.2 ISBN 83-7237-025-7 | AJ-Press |
| 48 | Monografie Lotnicze 57 North American P-51 Mustang P-82 Twin Mustang cz.3 ISBN 83-7237-129-6 | AJ-Press |
| 49 | North American P-51 Mustang ISBN 978-1-86126-830-3 | Crowood |
| 50 | Mustang At War ISBN 0-7110-0500-1 | Ian Allan |
| 51 | Spitfires and Yellow Tail Mustangs 52nd Fighter group in WWII ISBN 1-902109-43-0 | Hikoki |
| 52 | 315 (Polish) Squadron "Deblin" (Mushroom Blue series) ISBN 83-89450-00-3 | Mushroom Model |
| 53 | P-51 Mustang Nose Art Gallery ISBN 0-87938-782-3 | Motorbooks International |
| 54 | P-51 Mustang In Color Photos from World War II and Korea ISBN 0-87938-818-8 | Motorbooks International |
| 55 | Korean Air War ISBN 0-7603-1511-6 | Motorbooks International |
| 56 | Fighter Command ISBN 0-87938-473-5 | Motorbooks International |
| 57 | The 356th Fighter Group in World War II ISBN 0-7643-1768-7 | Schiffer |
| 58 | Yellowjackets! The 361st Fighter Group in World War II ISBN 0-7643-1466-1 | Schiffer |
| 59 | The 363rd Fighter Group in World War II ISBN 0-7643-1629-X | Schiffer |
| 60 | North American P-51 Mustang A Photo Chronicle ISBN 0-88740-411-1 | Schiffer |
| 61 | Mustang Over Korea The North American F-51 at War 1950-1953 ISBN 0-7643-0721-5 | Schiffer |
| 62 | The Spitfire, Mustang and Kittyhawk in Australian Service ISBN 0-9587978-1-1 | Aerospace Publications |
| 63 | 2nd Tactical Air Force Volume One ISBN 1-903223-40-7 | Classic |
| 64 | 2nd Tactical Air Force Volume Two ISBN 978-1-906537-01-2 | Classic |
| 65 | 2nd Tactical Air Force Volume Three ISBN 1-903223-60-1 | Classic |
| 66 | 2nd Tactical Air Force Volume Four ISBN 1-903223-41-5 | Classic |
| 67 | Warbird Tech 5 North American P-51 Mustang ISBN 0-933424-68-X | Specialty Press |
| 68 | The Mighty Eighth In Color ISBN 0-933424-57-4 | Specialty Press |
| 69 | The Nineth Air Force In Color ISBN 1-85409-272-3 | Arms And Armour |
| 70 | War Eagles in Original Color ISBN 0-9629359-2-1 | Widewing |
| 71 | Pacific War Eagles in Original Color ISBN 0-9629359-3-X | Widewing |
|
|